two of a kind

These are new bed quilts for my boys. The color scheme was inspired by these earrings.
When making these quilt tops, I had a little trouble measuring. The first time I made them, I thought something was a little off, but i couldn't put my finger on it. I put the quilts on the beds to check for size and decided to rip them apart and make them wider. When I finally re-measured the original pieces, I discovered I only cut them 55" wide instead of 65" wide. No wonder!!! So even though they look really simple, they gave me trouble, which seems typical. :)


Now that I finally got the measurements right, I am very excited. They turned out better than I had imagined. I adore the color combination. (thank you, Susan!) And without many seams, they are going to be so fun to stipple!

They each measure 68" x 90".

So I now have 4 quilt tops waiting to be finished. I'd better start making some backings. I should do that from my stash, but today, that doesn't sound appealing at all.

wee play

Hey, remember me? :) I didn't mean to disappear, but phew, last week was rough. I won't recount it all, but let me just say that remodeling (still) and being sick (for 5 straight days) don't mix well. I think I'm finally on the mend. Woo-hoo! And I'm thankful for antibiotics!!!!

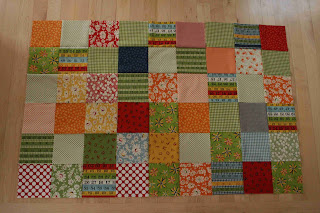
These are 9 patches (even though you really can't tell) that are going to be made into a disappearing 9 patch quilt. (Inspired by this fabulous quilt.) I'm really liking the blocks just as they are, but I am going to force myself to cut them into quarters. I started with 3 packs of wee play charms and then added various other Moda fabrics from my stash that coordinated, but not all are from the same line. It's going to be a twin sized when it's done.

There is a disappearing 9 patch tutorial here.

bento box quilt top


I finished piecing my bento box quilt top.
(And I think it looks pretty darn good on my bed!)
This thing is a monster-measuring 105" x 90".

For those of you who asked for a tutorial, I cannot share that, as there is a pattern published.

For those of you who asked for advice on making a king sized quilt, I have none. This is only my second king quilt, and the first one that I am going to attempt to stipple. I'm a bit intimidated at the thought. Unlike Miss Heather, who just finished her third-or maybe fourth-king sized quilt. I'm so proud of my quilting apprentice. :)
---
the quilt in the foreground is this one.

all zipped up

Can I just say that I'm happy that spring break is over? I am so ready to get back into a routine. I had a nap before lunch today since "vacation" really took it's toll on me. Oh, and that bathroom remodel didn't help, either. It's still a work in progress. My son (who is 6) predicts that it will take 19 months. I hope he is wrong. He had better be wrong.
-----
Now, let's talk quilts, shall we? This quilt is my 10th finish of the year. (!!!!)

Diane from Bee Square Fabrics asked me to design a quilt that would feature some of the gorgeous fabrics that she has in her shop. (She was so very fabulous to work with!!) This is what I came up with.

It is a zig zag quilt, but....BUT, it's made without piecing a single triangle. How nifty is that?

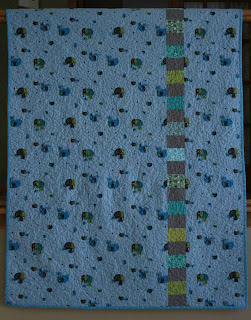
I used some of the leftover pieces of fabric from the front to add a strip of patchwork to the back. It's a little busy, but it made the backing just a bit wider than a normal width of fabric, which was just what I was after. How great is that elephant fabric? I LOVE it. And I love a pieced back, but you all already know that. :)

I used some awesome Jay McCarroll fabric for the binding. I love the little ants in it. (My kids do, too.) And the color. Mmm. Aqua!

I stippled the quilt (of course) in grey thread.

It measures about 46" x 61".

I LOVE this quilt. I have been wanting to make a zig zag quilt forever, and I am very happy with the results. This color scheme is one of my favorites these days.

There is a tutorial on how to make the quilt here.
And the fabric info (should you be wondering the specifics) is listed in this post.
-------------
edited to add:
Bee Square Fabrics currently has a promotion for 20% off the Jay McCarroll fabric. Please enter code "20offJay" during checkout. It is good until March 31st.

a few finished projects

Thanks so much for your feedback on my bento box quilt! It was great to get some objective opinions. I stared at the quilt too long and got stalled a bit. I'm excited to get back at it....I have a plan now. Thank you!!!

I finished up these hand knits yesterday. They are for my friend + neighbor, Mary. A pair of toasty mitts (pattern here) and a scarf (pattern here). I am not a good knitter, but I can see that I am making progress. I actually knit thumbs! Woo-hoo!
I'll be away from my blog for the rest of the week. (Well, I'm going to try to.) My kids and my husband are off on spring break and we are knee deep in a bathroom remodel. It's going to be such a fun way to spend our "vacation". :) Have a great week!

the beginnings of a bento box quilt

I finally started my bento box quilt and I'm having color doubts...

I'm not sure if I love the brown in the mix. Is the brown is too dark? Does it jump out too much?

Here it is without any brown. Does it lack a certain zing that the brown brings to the mix?

Since it will be going on my bed, maybe the brown fabric will be the key to tie everything together once it's done and on the bed?

What do you think?

red + white


Here is my quilt top made from the blocks I received from the Virtual Quilting Bee. It's nice to finally have it assembled!

I thought long and hard how to put these blocks into a quilt top. I couldn't decide what color to use for sashing, so instead, I added a 3" border (3.5" cut) around each block, which made each block 18.5" unfinished. The blocks are HUGE! It was fun to be able to put 12 monster blocks together to make up a substantial quilt top. I much preferred adding borders to each block rather than working with long sashing strips. The colors of the blocks lent themselves well to adding white borders to half of the blocks and red to the other half. The quilt top measures 54" x 72".

Now I have to come up with something for the back. From my stash, of course. :)

I'd like to say thanks to the lovely ladies that sent me such fabulous blocks!

a new project

I've finished up 3 quilts in the past week, so it's time to start some new ones! Hurray!

These blocks are for a block of the month that Anina is hosting.
More details here.
I'm not only paper piecing, but I am enjoying it! Go figure.

hopscotch

You know how I have such a hard time naming quilts? Well, I finally came up with a solution. I called on my blog friend, Susan (who is one creative + clever gal), and she agreed to help me name my quilts!!! I'm quite excited to have her on my "creative team". Thank you, Susan!

This little quilt is made up from scraps and white muslin from my stash. I didn't have anyone in mind when I started making it-I just wanted to try a slightly different style of random piecing and I wanted to use up some scraps. It was challenging for my little brain to figure out the math so the squares would go to the edges of the quilt, but it was worth it. I love how it turned out.

The backing and binding came from my stash as well.
It measures approximately 36" x 44".

I will be sending it to the Mountain Baby Blankets project. It's good to know that this little quilt will help keep some baby warm at night.

vintage kitchen quilt

Here's my finished swell quilt. I like it but I'm not in love with it yet. Maybe I will be after it's washed and dried? Or maybe my feelings for it are tainted by the March funk I'm in? I'm not too sure. Either way, it's finished.
It took a long time to piece.
And to quilt. (Over a week and a half just for the quilting---off and on.)
This quilt is h-e-a-v-y. My son even commented on that while he was holding it up for the photo-it must be all those bulky seams from the triangles.
I paired the swell charms (I used 4 packs) with quilter's only cotton in the color parchment (from JoAnn's).

I pressed the first seams (the diagonal ones) open, rather than to one side, which made the assembly of the quilt top much easier. I learned that lesson after making an hourglass quilt.

It measures 58" x 75".
I love a striped binding. This is lighter than I would normally pick for binding, but the stripes won me over.

The backing is also from the swell line. I love the bold print. I think this is the first larger quilt I've made that I've splurged on the backing by using all "quilt shop" fabric. (It was on sale, but still, it sure adds up quick.) I'm glad I did.

Since this quilt looks somewhat vintage already (love that), it should get better with age. I can only hope the same for me. Ha!

one of today's projects...


i finally said goodbye to the circa 1997 floral wall paper in one of our bathrooms. it's so not my style. it took less than an hour to remove it. hurray! and now i'm wondering why it took me 362 days to get around to do this. next to go...the hunter green walls. soon!

sewing for therapy


i got back to work on my spiderweb quilt yesterday. it is good "wind down" sewing. it's fun to play with different fabric combinations. and it's a great way to use up those small pieces of fabric that i can't part with for some reason.

i've decided that i am going to make it a twin size, so i'm just about 1/3 done with the top of the quilt. if it takes me the rest of the year to piece it, i'm ok with that. i'm enjoying the process. and i'm also thinking i need to make one in PINK, as there is no shortage of pink scraps in this house.

the tutorial is here.

i couldn't resist


last week i purchased my first japanese fabric.
from bee square fabrics.
i think i found a new favorite on-line fabric shop.
(check out the sale section, too!)
oh, and please don't blame me if you blow your grocery budget on fabric. :)