I'm in over my head

alternate titles to this post could be:

I can't do it all, but I'm trying my hardest to anyway. (and driving everyone crazy in the process.)

or

my kids have been watching a lot of PBS and movies this week.

or (my personal favorite)

too bad my stay-at-home-mom job lacks vacation time, because I sure could use one.


This week instead of my usual blogging and quilting routine, I :

started painting my kitchen red...three coats down, one to go. The brass light fixture is the next thing to go.

turned over a small garden plot (by hand!) and planted a vegetable garden (note to self: don't try to do these two things in the same week ever again.) 

spent one afternoon pushing 2 of my 3 children (60+ lbs.) in the stroller around town for a two hours while running errands (and for exercise, of course). 

spent 2 days cleaning my house....for what? it's already dirty again. 

I really am in over my head. I don't like this feeling one bit. And it scares me that I am feeling this burnt out with summer vacation looming. 

So in the interest of trying to regain some sanity, I am on a mission to try to finish up some WIP's, in quilting and otherwise.

Wish me luck.

star quilt along, week 5

Welcome to week 5 of the star quilt along. 

For this week's block (I'm not sure of the name) I have changed colors because my photos from the first time around were pretty poor. I made this block last night and it didn't go that well. I wasn't in a mood to be quilting (which I didn't know was possible) so that must have been part of it. Anyway, when I sew my block in a quilt top I am going to lose every one of my little points around the outside edge. Oh, well. At least it looks good squared up. 
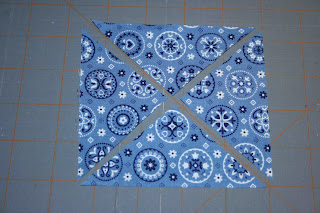
cut one square 7  1/4" from the background fabric
cut it on the diagonal twice, to make quarter square triangles
cut 5 squares 3  1/2" from the background fabric
cut 2 squares 3  7/8" from the background fabric
cut those each in half diagonally once, to make 4 half square triangles
cut 4 squares 4  1/4" from a medium print fabric
cut each of those squares on the diagonal twice to make 4 quarter square triangles from each square, for a total of 16 triangles from the medium fabric
cut one square 4  1/4" from a dark colored fabric
cut in half twice on the diagonal, to make 4 quarter square triangles
layout as shown (never mind that the bottom left corner is already sewn together)


Once it is all sewn up, square up to 12.5".

Any questions, I'll try to answer them in the comments.

wip


I've got a new work in progress.
I am pretty excited about it since it is improvisationally pieced and uses only scraps, my two favorite things when it comes to quilting.

I'll be back on Tuesday with week 5 of the star quilt along.
Hope you have a fabulous weekend. 

hourglass block tutorial

Thanks for all the quilt love yesterday. It made my day.

Here is a little tutorial how to make an hourglass quilt block.
cut 2 squares 6"

I picked 6" because that is the size of my ruler is, so it made for easy cutting. You could use charm packs like Erin did, you will just get a smaller finished block.

cut each square in half diagonally, twice, to make quarter square triangles
take one triangle of each color and place right sides together

I find it easier to sew the triangles if I start at the top right hand side of the triangle and sew down to the point.

chain piece together all 4 sets. at this point, make sure that all your dark or all your light triangles are on the top, not a mix, or your blocks won't come together as needed. (if you don't, you will need to spend some time with your stitch ripper. I know this from experience.)

normally, I am not a proponent of ironing seams open, but in this case I would, otherwise it gets very bulky at the corners and it makes it hard to quilt over those points.

pin, starting at the center and work out to the edges. that will give you a nice crisp point in the middle. don't worry if the ends don't line up perfectly, those parts will be hidden in the side seams.

sew together, press well and trim off the overhanging ends of the triangles

The finished size of the block will be about 5". For Nancy's quilt, I made the layout 12 x 15, so I needed 180 blocks to get a 60" x 75" quilt. This type of quilt would lend itself to a scrappy quilt quite nicely. Yes, I'm already planning. 

Enjoy! If you make a quilt using this tutorial, I'd love to see it. 

a tribute

Once upon a time, there was a couple who were young, expecting their first child and in the midst of a huge remodeling project in their first home. The project was so huge, in fact, that it necessitated them moving out for a period of 6 months while their house was rebuilt, inside and out. There were other things going on, too. The husband was working 1 1/2 jobs-one being a rotating 12 hour shift job. Things were crazy.

Enter a sweet, mature, handy and creative couple-a cabinetmaker and a quilter. They had a good 20 years of life experience that the young couple didn't have. They offered to hang cabinets, helped paint walls, cooked meals. They stepped in an befriended the young couple at the most perfect time possible. 

That young couple was my husband and me. And our friends Bruce and Nancy were hugely instrumental in our lives. Nancy taught me how to quilt. And there is not a day that goes by that I am not extremely grateful for the time that she took to teach me.

Today is Nancy's birthday. And I thought it fitting to (finally) make her a quilt. It's a pittance of a thank you for all she has done for me, but hopefully it's a start.

She is a friend, but more than that, a mentor. She shared recipes, counseled me through days with a colicky baby, days of cabin fever during those LONG Minnesota winters. She babysat our boy, and became Nana to him. She unpacked boxes of kitchen stuff after we moved. Helped throw me a baby shower. So many things, I could go on and on.

She still cheers me on. She reads my blog daily and she joined in the first quilt along. She has done so much. Little things, but big things, you know? 

So, thank you, Nancy. 
I hope you have a fabulous birthday.

gifts for me (and my girl)

It's a big mail week here. I have been preparing many packages to send out, (it seems like these things happen in waves) and unlike Kristen, preparing packages is not my favorite thing to do. I don't want to spoil any surprises, so I will show you what I have received lately, instead.
Heather made this bag for a friend who custom ordered a pink and brown bag. This friend thought it was a little too pink (which I totally can't comprehend), but it worked out well for me, because this bag is now mine. I LOVE it. A pink and brown purse has been on my list of things to make forever, so that is one thing I can cross off my list. Hurray.
My friend Rhonda, in Michigan, (who is blogless) made this sweet little hat for my daughter. Isn't it adorable??? My daughter and I both love it an awful lot. It fits perfectly, too. I'm so impressed, she just whips up these hats, so she says. Yes, very impressive.
Jacquie sent me this sweet teacup quilt as a thank you for the quilt along. You can read more about it and see her fabulous quilts in this post. She is generously sharing her pattern for the teacup quilt on her blog. Once I paint my walls, this is going to hang right outside the door of my studio. It is fabulous, Jacquie. Thanks so much.

star quilt along, week 4

Welcome to week 4 of the quilt along.
If you are inclined to join in, but haven't yet, let me know. It's not too late. :)


cut one square 7 1/4" from the background fabric


cut in half on the diagonal twice, forming 4 quarter square triangles
cut 4 squares 3 1/2" from the background fabric

cut 4 squares 3 7/8" from a medium print
cut 4 squares 3 7/8" from a dark print

cut only 2 of each of these in half on the diagonal once
to make:
4 half square triangles from the medium print and
4 half square triangles from the dark print

mark a diagonal line on the back of the 2 remaining medium print squares (to prepare to make triangles)
take the 2 remaining dark and 2 remaining medium 3 7/8" squares and layer them together, right sides together.

sew a quarter inch seam on either side of the diagonal line, cut apart on the pencil line, press open

to make 4 squares

layout as shown


sew together and square up the block to measure 12.5".


I'll try to answer any questions in the comments.

a (pink) quilt in a day, part 3


I know I said that my next monochromatic quilt was going to be brown, but after all the disappointment in my quilting this week (see previous post), I took out my pink scraps and got busy.

This is for my monochromatic challenge and my quilt in a day series. What can I say? I like to be efficient. The quilt top measures 55" x 70". What amazes me is how many pink scraps I still have leftover. I think I may need to make a pink version of this quilt.

As far as time frame goes, I started piecing this on Monday night around 8:30 and I finished piecing it Tuesday night around 10:30. The making of this spanned about a 26 hour period, but I figure that's close enough to count for a day. And yes, I did eat, sleep, cook and clean. :)

This is version 3 of the house of girls quilts. You can see version one here and version two here. I think that the third time is a charm. I've definitely got to keep this one. 

Many of you have asked for a tutorial on this type of piecing. Since it is so random, that would be hard to do, but I'll try to explain my process. Basically, I take 2 pretty pieces of fabric, sew them together, press the seam open, and add another scrap of pretty fabric. Keep adding pieces randomly in an arrangement that is pleasing to the eye. Once you have a fairly large piece, set it aside and repeat. When you have several larger pieces, arrange them on the floor (or design wall) and fit them together like a puzzle. At this point, you may need to add in a fabric here and there to make it all fit. You can also chop off some ends that are too long. The more variety of fabrics, the better. But you also want to limit your color palette, so it's not chaotic. There is a fine line in achieving that balance, I think. This type of piecing is very fun and freeing, so if you haven't tried it, I would encourage you to do so.

One more thing: thanks for all your kind words and suggestions on what to do with my batting disaster. I will keep you posted on what I decide to do.

seeing stars

My seeing stars quilt is done. 
Here is the backing and binding...
and on my daughter's bed. 
I love the stars and the secondary design that the setting blocks make.

Unfortunately, after taking it out of the wash, I discovered something very, very bad. A few weeks ago I bought 16 yards of what I thought was Warm and Natural batting (at JoAnn's), but it ended up being Fairfield White Cotton Batting. The fibers in that particular batting are larger and more twiggy than in the Warm and Natural batting. At this point, I realized it wasn't Warm and Natural, but I thought it would be fine.  So I sandwiched and quilted it, bound it, washed and dried it. I was delighted when I took the quilt out of the dryer. It was all puckered up, just like it should be. But, after looking at it a bit, I noticed several of the dark spots from the batting showing through the white fabric. I am sooooo disappointed. I can't tell you just how much. Then, I discovered that one of the natural fibers must have gotten too hot in the dryer and it actually burned the fabric.
I'm just sick about it. 

I talked to a manager at JoAnn's and they agreed to exchange the rest of the batting that I haven't used yet used for Warm and Natural. But what do I do with my less than perfect quilt? 

I've been wracking my brain to think of what kind of applique I could do to cover it up. I have even considered ripping it all apart and fixing it. (A lifetime project.) Or else I could hang it on the wall so you can only see it at a distance and not see all the imperfections. I am afraid I am too much of a perfectionist to just use it as is. 


And, to add to that, I was hours into quilting this quilt, in which I used the same batting. So now my new project is to rip out 4 bobbins worth of quilting, just so I can change out the batting.

It's been a bad quilting week here.