7 random things + fabulous gifts in the mail

I have been tagged several times now for the 7 random things meme. (I LOVE to read other people's lists. It's much more fun than writing my own.)

1. I am left handed.

2. I bake nearly all of my own bread (with the help of my bread machine).


organizer pouch from Sarah P.


3. I worry about nonsense things like: what will I do when I fill up my quilt cupboard?

My husband also teases me about worrying about paint coming off the walls.

4. I have become quite the homebody. I like to think that I am adapting very well to my current situation of being a stay at home mom. :)


bracelet from Katie.

5. I have made about 60 quilts baby size or larger. This summer will mark 8 years of quilting for me. Many thanks to Nancy for teaching me.

"Dot" from Linda, for my 5 year old.

6. I have reoccurring dreams that I am a runner and that I enjoy it. I'm not sure what that means. I think running is torture, so I admire those who do run. (susan, erin) I also have reoccurring dreams that I am a smoker. (I am not.) I don't get that one either.

Mitts from Carolyn, made just for me!!!

7. I have not had a blogger meet up yet. I tried meeting up with Carolyn a few times, but it hasn't worked out. I know several bloggers in real life though.

(oh, my, that was difficult.)

Care to join in? I am not going to tag anyone specifically.

Thanks, ladies, for all the wonderful mail!

---------

I am planning on working on this this weekend. I am sure my husband will be thrilled. ha!

green, revisited


so, this is round 2 of the green quilt.
you can view round 1 here, which is no more.

I have never, ever, ever had such a hard time with a quilt. ever.
apparently green scrap fabric is my nemesis.

that being said, I am finally happy with how this is shaping up.

ragged squares quilt

I finished another quilt today. Hurray!

I had it nearly quilted when I had to stop to work on this quilt top, then this quilt needed to be completed on a deadline, so it had to sit for a bit. I like staggering my quilts in progress this way, though. It keeps things interesting.

I finished quilting it yesterday. Straight line quilting is not my cup of tea. Give me meandering any day!

I had to remove grease spots from this one, too. My walking foot was to blame this time. I tell you, if it weren't for Murphy Oil Soap I think I would be pretty proficient at applique right now. (I'm glad that I am not!)

This is my favorite square...

and here's the backing, which reminds me of vintage linens. It's Tracy Porter fabric from JoAnns.

I love the weight of this quilt...it's a bit heavier than most because I didn't cut out behind the stacked squares, so it has 3 layers of fabric in some places. It puckered up nicely after washing just like I had hoped. I had to do lots of trimming on the raw edges after drying it. LOTS of trimming.
------------
If any of you are working on the quilt-a-long and your name isn't on the list, would you please let me know? I would appreciate it.

fun with boxes quilt

I had a little boy turn 5 this weekend.

So a new shirt was in order...

and so was a new quilt.

This is one of my favorite squares.
I love that number fabric. (Thanks, Taia!)

The backing...

Lots of quilting...

And the binding.

He loves it.
I love it.

I think I could make a hundred of these. They are so fun to make and I love how the little boxes of color float in the white.

Looking back, it's very reminiscent of this quilt, which I finished nearly one year ago. OK, so maybe I could make 99 more of these. :)

basting

Welcome to the quilt-a-long! Are you seeing the light at the end of the tunnel yet? We are so close to being done.

Once your quilt top is assembled, it's time to baste, which is another term for putting all the layers of your quilt together (backing, batting and the quilt top).

My quilt top is about 68" x 88", so I bought 5.25 yards for the backing. It was just enough. I don't go by the rule that your backing and batting need to be 4" larger on all sides of your quilt top. I like to squeak by with as little waste as possible.

I pin baste my quilts with curved safety pins. There is a tutorial here.

And now you are ready to quilt! I plan to put together a tutorial for next week on free motion quilting.

crisis averted

So I started quilting this quilt last night. And this morning I saw these grease/oil marks from my machine. Of course they are on the white. YIKES!

now you see it....

now you don't.

thanks to Murphy Oil Soap.
worth. every. penny.

p.s. spell check is working again. woo-hoo!

rag rug tutorial

Since some of you expressed interest in how to make a rag rug (see this post), I thought I'd try to write up a tutorial. Let me know if you have any questions, and I will try to answer them in the comments.

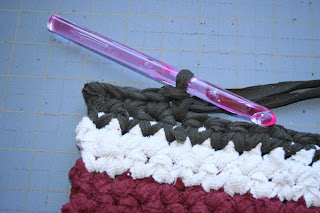
First, lay your t-shirt flat. Cut off the hemmed end and discard.
Just a warning...this does make a bit of a mess on your cutting mat.
Working from the bottom of the shirt, cut in 1/2" strips, leaving the side seams in tact. This will form loops.

You can cut a few loops from each sleeve, too. Again, discard the finished ends.

Once you have loops cut, use a slip knot to join them.

Pull until the knot is snug.

Make a string long enough to start crocheting.

Using a P hook, chain stitch to desired width. I started with 50 stitches and my rug is approximately 30" wide. Chain one more. (to use for turning)

(Ok, I am going to change colors here, because this rug is already in progress.)

Single crochet in each space.

Join a loop when your "string" runs out.

At the end of the row, chain one...

Flip over the rug and begin working in the first space with a single crochet.
Continue single crocheting in each space.
Keep working back and forth until the rug reaches the desired length.

Knot and weave in the end.
This is the rug that I crocheted last summer. I have run it through the regular washing machine a few times and it has held up very well. I used about 20 knit shirts used to make it.
If you make a rug using this tutorial, I'd love to see it.

finally!!!


After working on it for nearly 3 days straight, I got the top together. (Well, 3 days of my free time, anyway.) I am a little burnt out on the precision piecing now. I need to get back to some random piecing to calm my nerves a little bit. That being said, I LOVE IT! It's better than I had imagined.

There is a border pieced square border on the top, you just can't see it because that is what my little assistants are gripping while I shot the photo. :)

finishing your quilt top, part 2

Today we will be working on the borders....

cut out 430 squares 2.5"
yes, that's right, 430.
I think you may have 2 leftover, but that will be helpful when you are laying out your squares randomly.
(I know that is a lot of squares...please don't hate me. It'll be worth it.)

Sew the squares together making borders for the quilt.
The squares should be 2 deep on the bottom and the top.
The squares should be 3 deep on the left and right sides.
(Click on the photo to see the detail.)
These should go around the entire quilt.

Once the squares are sewn around the perimeter, add your solid border. This should be cut 6.5" x the length of your quilt.

Then, add one square border around the perimeter of the solid border and your quilt top should be done.

I'll show you photos of the completed quilt top when I am done. That's right...I can't even keep up with my own quilt-a-long. :)

wip friday


1 knit scarf
7 quilts
1 crochet blanket

with all this in progress, it's got even me wondering why I am on the way out the door to shop the President's Day sale at JoAnn's.


here is the start of the green quilt.

I've been hesitant to show it, because I am really not happy with it. I've been pondering what to do with it for weeks. Right now I'm wavering between trying to find the problematic area (if there is just one?) and fixing it, or cutting it all apart and just starting over.

hope you have a great weekend!

Happy Valentine's Day!


I'm not a huge fan of this holiday.
But heart shaped pancakes are fun.
And my little ones appreciated them.
That makes me happy.

Also, Happy Anniversary to Linda and J!

And for all those who asked...
Green is the next monochromatic quilt.
It's in progress, but it needs some tweaking before it is shown to the world.

Hope you have a great day. :)

first finish of the year


This is the first in a series (I hope) of monochromatic quilts. When I started this yellow one, I was very nervous that it was going to turn out putrid. Much to my relief, I don't think it did...I love the results. If you didn't notice, I am hooked on random piecing. I think the pieces of vintage sheet (thank you, Roxanne) really helped tie all the colors together.

I backed it with yellow polka dot fabric from last weekend's shopping trip.

The finished size is about 43" x 51".
After washing and drying, it puckered up nicely.
I. love. that.

(is it just me, or is spell check not working on blogger? I had to get out my dictionary to see if I spelled putrid right.)

second time's a charm


Here is my completed block for Jennifer's virtual quilting bee.

It was my second attempt-the first block was just a touch too small, but too big to add another round of logs. So I started over. This one had a bit more wonkiness, which I like. I also like the chenille for the center.

Now I have an orphan block, which makes me think that either I will make 2 of each block throughout the bee and make my own sampler quilt at the end (which would be challenging, but fun, no doubt)...or else I may just make a quilt based on these colors, because oh, my, they are fun.

finishing your quilt top, part 1

As you may know, this is the quilt that I am basing the quilt-a-long on. Should you want to use this layout, I will try my best to explain it here. The finished quilt will be about a twin size.

There are some great ideas on how to put together the blocks here and here. And if there are more, feel free to send me the links. I'd love to see them.

First, I layed out the blocks in an arrangement that I liked. I usually take a photo at this point and view the quilt on the screen of my digital camera. It really helps me find color clumping or unevenness.

Then, I measured my remaining background fabric. I had a piece about 2 2/3 yards long. I cut 4 pieces 6.5" by the length of the fabric and set them aside for the final borders. It's much easier to do the borders this way than to have to piece them later.

Next, I cut out 17 rectangles 4.5" x 12.5" from the background fabric. This is your sashing.
Cut at least 24 squares 2.5" from various fabrics that you used in your quilt squares. I cut extra squares, but will use them for the borders later.

Sew 4 2.5" squares together. Make 6. These are called 4 patches.

Use the 4 patches and the sashing to separate the 12" blocks as shown.
Working in rows, sew together.

Next week we will work on the borders.

I look forward to seeing all the nearly completed quilts.
Happy Monday!

new fabric

I am beginning to feel like Mama Urchin. I have piles of WIP's, but nothing to show for them. I am starting to panic because I haven't completed one quilt yet this year and we are well into February. Hopefully this week I can change that.

I have new piles of fabric, due to my successful shopping trip yesterday. It was so nice to buy fabric again! Most of the pieces above are to add to the stash. A few of the pieces will be bindings for some quilts I have in progress. And yes, I do have a polka dot obsession.

This is decorator weight fabric that I found in the bargain bonanza section for $1.29/yard. Isn't it adorable? There was no way that I could leave it behind. I am thinking curtains for my girls room and also a few quilt backs.

Tomorrow it's back to the quilt-a-long. We will be working on assembling the quilt top. I am anxious to see how everyone's quilts come together.

Enjoy the rest of your weekend!

it's good to be home...


...and back in the quilting groove.

Vacation was pretty good. It's a lot of work to be on vacation (especially with kids-even if it was only 2 out of 3), but it was wonderful to be able to soak up some Florida sunshine. It was nice to need a sweatshirt because the air conditioning was cranked up too high rather than because the temperatures have plumetted below zero. It has made me especially anxious for spring, though.

The quilt above was made by Heather. I quilted it, making good on my end of the bartering deal that we had made. I am always in awe how much quilting changes the look of a quilt. It's fun to watch it transform each step of the way.

Of course I am doing a little quilt planning of my own. Never mind that I have a bunch of quilts in progress already.....I think I am up to 8 currently. These are the fabrics that I have chosen to make my own happy hour quilt. I just love that pattern.

This weekend I have a fabric shopping trip planned and I am sooo looking forward to it! I haven't bought any fabric so far this year, and I am ready!!! My main goal is to find some backing fabric for the 5 quilt tops I have finished. I also have a list of things that would be helpful for the stash, in case my eye would wander. ;)

Happy weekend to you all!

quilt-a-long week 12

Hello there. I realize that I am a few days early in posting the block for week 12, but I figured better early than late. Our vacation is about to kick into high gear and our internet access will be sketchy for the next several days. So here is the last block....


cut 4 squares 4 7/8" from the background fabric

cut 4 squares 4 7/8" from a colored fabric
cut 1 square 4 1/2" from the same colored fabric

use the 4 7/8" squares to make triangles

layout as shown

and your last block should look something like this.

I can't wait to see how you all put your blocks together in a quilt top! Happy quilting and I'll "see" you all at the end of next week.