math facts quilt

The inspiration for this quilt came to me while I was watching an old episode of Oliver’s Twist on Netflix. There was a throw over the couch that was brilliant, simple and fun. It was full of white plus blocks on an orange background. (You can see it here....isn't it FAB?) I knew immediately that I was going to make something like it. I have no idea who made the original quilt/rug/throw (???) but I was smitten. I wanted to add a twist to my version, so I sketched a bit and I decided to add an x block in place of every other plus block. That changed it just enough to make it "mine", while still retaining the simple and fun feel of the original. I used various background fabrics, but I chose to keep them very close in value and color. I started with oranges from my stash but had to actually supplement by buying fabric. Oh, darn! ;)
I absolutely LOVE the results!!! I know I say that a lot, but this one, oh boy! I want to make at least three more versions of it. It would look good in lime green and white as a baby quilt. It would look fun scrappy! It would look good with one single orange background. And...well, you get the idea!
I pieced the back using 3 different 1/4 yard cuts of orange and plenty of cream fabric. I really like the way it turned out.
I LOVE the scissor fabric! It's Half Moon Modern, by Momo for Moda. I think that it's funny that they are "fiskars orange". That's not the official name, of course, but that's what they remind me of.
For the quilting....I started stippling it, but it looked horrible. I ripped out the stitching and switched gears. I decided to echo quilt around each x and + with my walking foot. That worked SO much better. I had to turn the whole quilt in my machine at every corner, but it was so worth it. At that point, I was so glad I hadn't made the quilt any bigger!
For the binding I used these fabulous dots...Mingle in Tangerine by Robert Kaufman. Mmmm. When I saw them I knew they were going to be perfect to finish off this quilt. They make me smile.

My youngest son came up with the name for this quilt. He saw the sketch I had done and said "that looks like math facts". I loved it, so the name stuck.

The quilt measures approximately 60" x 76". I wrote up a pattern for this one, which is available for sale in my shop.

scrap therapy

On Saturday I took some time out to just play with scraps. I ended up making this mini mat for my dining room table. I L-O-V-E it!!! Playing with scraps is my very favorite! I really enjoyed the process of hand quilting it as well. Not to mention starting and finishing a project in a single afternoon. It felt so good...so theraputic!
Also, on Saturday, I cracked open my very first pair of gingher scissors. Oh-my-goodness!!!!!!!!!!! What on earth took me so long? They are delightful. Just when I thought playing with scraps couldn't be any more fun......

finish it up Friday, week 16

Welcome to week 16 (!!!) of finish it up Friday! Can you believe we've been at this finishing business for that long already? Doesn't finishing feel SO good???
I finished my largest knit rag rug to date. This was made using gigantic (size 35) knitting needles. It measures  28" wide by 35" long, and it's an inch thick! It literally weighs almost 5 pounds. It's one of my favorite things that I've ever made.
This is the ultimate scrap project. For the fabric, I used skinny strips, strings and selvages that otherwise would have been tossed in the trash. It feels so thrifty and SO good to make a rug out of those seemingly useless leftovers. The rug looks instantly vintage...like something that would have come from Grandma's house. In a good way! :)
The texture is incredible! It massages your feet when you step on it. An added bonus, I get a sneak peek of some of my favorite fabrics in the rug. So much goodness!!
I worked on this rug off and on for about 2 1/2 months. I only remember that because I got a fresh batch of selvages from Jennifer at the quilt retreat last November and I started it after that. :) Thanks so much, Jen! This is one of those projects that is nice to have going at all times...which means I think it's time to start another!

Now it's your turn! Please link up your finish for the week, then go ahead and cheer on some of the other finishers, too. Thank for joining in my linky party! Happy Friday to you!

being intentional

As you may remember, it is my resolution this year to be more intentional. I did a little intentional sewing today, which felt great!
Margaret's Hope Chest is accepting blocks for their January/February Project Hope through the end of February. This is kinda last minute, (so typical of me!!) but I figured close to date is better than not doing it at all! I think it's a wonderfully easy way to help a great cause....much easier than completing a quilt top or an entire quilt. If you would like to help too, you can find all the details here.
I've been feeling kind of burned out by this star quilt, so I decided that I'm going to be intentional by adding one star a day. So far I'm on day two...and I think it's going to help! Hopefully I last longer than a week. :)

crazy mom quilts: one way to make a ragtime quilt

Why hello there! :) Today I'm happy to share a little tutorial on how to make a ragtime quilt. As with any of my tutorials (or any of the work on my blog, for that matter), this is not the only way to make it, it is just one way to make it. I'm simply sharing my approach. I'm by no means known for having the most direct approach. Ha!
This quilt finishes at about 40" x 60". I'd consider that a large baby quilt or a child's lap quilt. The fabric is a fun line of flannels by Connecting Threads called Wild Ones. I used 27 fat quarters. I did not pre-wash my fabrics.
First, press each of your fat quarters. From each FQ, cut out 12 5" squares.
Cut a total of 300 5" blocks.
Cut 150 4" squares of batting. I'd recommend using warm and natural or warm and white batting. Or both. :) This is a great way to use up batting scraps! I would NOT recommend using any batting that is medium or high loft. It will be a wrestling match. Alternatively, you could use flannel in place of batting (I haven't tried it) OR you could simply use flannel for both layers and omit the batting altogether. (I haven't tried this, either.)

Keep your squares in pairs, so the front and the back will be the same. I would recommend this 99% of the time. On my last rag quilt I went completely scrappy, so the fabrics were different on each side, and it worked pretty well. But when it comes time to layout your blocks, keeping the fabric the same on both the front and the back will make things much, much easier. 
Take one square of fabric, place it face down. Layer a batting square on top, centering it. No measuring is required, just eye ball it. Take another square of fabric, place it face up on the batting. Of course you will line up the top fabric square with the bottom square. In this photo it is offset for illustration purposes.
Use your walking foot (I would recommend matching thread in both the top and bobbin) and quilt an X through the block, from corner to corner. Repeat this process for the remaining 149 blocks.
Take any 2 random blocks, and sew them together using a 1/2" seam allowance. Sew blocks end to end, until you have 10 blocks joined together. Make 15 rows.

This is my big tip. Use a zipper foot rather than a walking foot to join the blocks together. Angela actually suggested that in the comments of this post. Thanks so much, Angela, you are a genius! The zipper foot worked fabulously. When I was using a walking foot to attach the blocks together, I felt like the bulk of the batting kept pushing against the walking foot and often times the seams were wavy. The zipper foot made it so much easier to sew a straight line by just following the ridge. Sweet!
Once all your rows are complete, lay them out on the floor in a pleasing arrangement.  Take a photo and check for color clumping. Rearrange any rows if needed. When making patchwork, I almost always do this....make random rows and then arrange the rows. It's so much easier than arranging 150 squares separately!
To join the rows together, take two strips and nest the seams, as you would with any patchwork...except you really don't need to press your seams! Pin at each intersection. Sew the rows together, again, using the zipper foot and 1/2" seam allowance. Toward the bottom of the photo you can see how the seams point in the opposite direction from each other after they are sewn. Repeat the pinning and sewing until all the rows are joined together.

Sewing the rows isn't the most fun part of making this quilt....I suggest that you take it slow and easy. I felt like I had to do a good deal of pushing/pulling the quilt to get it through the machine, but it wasn't unbearable, either.
After all the blocks and rows are joined together, sew a 1/2" seam around the perimeter of the quilt.
 
The last step is to use a scissors to cut some fringe. I made several cuts 1/2" apart or so, perpendicular to the seams. Be careful to cut close to the seam, but not through it. Once all the fringes are cut, wash and dry it. It will transform into one cozy quilt! Be sure to monitor the lint trap in the dryer, especially after the first washing. I'd recommend checking it at least a few times during the drying cycle, as it produces a LOT of lint!!
This is what the back of the quilt looks like. Just like the front, but no fringe!
Here is the quilt in use. It was a custom order for a little girl that is battling severe health issues. It's so fun to see her enjoying her quilt. Isn't she a cutie pie?

If you use this tutorial to make a quilt, I'd love to see it. Also, feel free to add it to the crazy mom quilts flickr group!


yep, still crazy

I made this quilt in two days! I will be the first to admit that I'm crazy! Back in January I received several boxes of fabric from my husband's best friend's sister's mother-in-law. (got all that?) My husband's best friend came down to visit this weekend. So, on Thursday morning I decided that I should make him a quilt from the fabric he passed along to me. He arrived at our house on Friday night. Once I decided to make it, I had no time to mess around!
I was planning to make it all from 5" squares, but due to the time constraints, I decided to mix 4 patches made from charm squares and larger blocks that finish at 9". I'm so glad I did! I had the quilt top done in a few short hours. Yay!
Then it was on to basting and quilting. For the quilting, I did a simple stipple in khaki thread. Thankfully, it all went smoothly. This red fabric on the back isn't a perfect match to the front, but I figured it was close enough. I actually liked having a darker fabric on the back. It adds a lot to the quilt.
I used a plaid fabric for the binding, which was just screaming to cut on the bias. I was a little nervous as to how top stitching the bias would work with machine binding, but I'm happy to say it went just fine and dandy. Actually, mitering the corners went much smoother than usual. What a happy surprise! I had the whole quilt done by 7 pm on Friday. I'll admit, I was pretty tired!

The quilt measures 63" x 81". I'm so glad that I finished it in time, even if my arms a little worse for the wear. :) I'm happy to say, he liked the quilt.

finish it up Friday, week 15

Welcome to finish it up Friday!
This quilt has a great story...at least I think so. This was a WIP twice removed. (ha!) The quilt top was pieced by Evelyn Fisher from 03-06, age 90 1/2. See, it even says so in the corner of the quilt.
The top was hand pieced. (Not extremely well, I might add. I had to machine stitch up a few gaps.) But it still has plenty of charm. At some point Sarah acquired the quilt, I believe via ebay. She attempted quilting it, but she got stalled out. I don't blame her one bit. A few years ago she put it up for adoption on her blog. She kindly sent it to me, and then it became my WIP. It sat in my basement closet for quite awhile.
A few weeks ago, when Tara was here, I showed it to her. She suggested I tie it, in keeping with the vintage feel of the quilt. So I ripped out the quilting that had been done and tied it up. It took me at least 5 hours to tie it. The kids all helped out and even my hubby tied a few knots. Even still, boy, was I sore the next day! But it was totally worth it.
To bind it, I cut the backing a few inches larger than the top, then folded it over (twice) and stitched it down. So, this WIP is finally done! I'm happy to be the one to have finished it after 9 years. I have been sleeping under it the past few nights. I just love it. So very much. Probably because it reminds me so much of quilts that I slept under when I was a little girl.
The quilt measures roughly 72" x 84". It's going to replace this family favorite.

Now it's your turn! Please link up your finishes for the week here. Then go ahead and visit a few other links so we can cheer each other on in our finishes. Happy Friday to you!

tumblers

I finished my tumbler quilt! A good friend sent me the pieces already cut out. What a sweet gift! All I had to do was assemble the blocks. Rather than baste and then quilt it, I basted it (sort of), then turned the quilt. This eliminated the binding. I was a little nervous to do so, since I hadn't done that since my first quilt, but I really wanted to leave the edges wavy.
After turning it, I hand quilted it using this vintage thread that came from my grandma's house. Perfect! (The thread, not the stitches. :) )
The back was pieced from the stash. I love how the black stitching worked on this quilt, both on the front and the back. I wasn't so sure it would work, but it ended up being just the right accent for all the colors. AND the backing. I love it when things come together like that.
I had to include this photo of my little helper guy. He's such a trooper. Sometimes I wonder if he hates being the tallest kid in the family. :) I just love this photo.
The quilt finishes 53" x 65"....it's the perfect lap size. It's already gotten a lot of use!

never say never

At one time I declared that I would NEVER tie a quilt with yarn.
Today I am eating my words.
I'm tying this quilt.
With Red Heart yarn, no less.
At least I used a coupon when I bought the yarn.

finish it up Friday, week 14

Welcome to finish it up Friday! I have a finished quilt to share today, which always feels good!
This sweet little baby quilt was made from just one layer cake. I even had a few squares leftover, which I didn't mind a bit. :) The fabric is A Walk In the Woods, by Aneela Hoey for Moda. I just love it! It is soft & sweet and wonderful to work with. And did I mention it's as cute as the day is long?
To quilt it, I free motioned a simple loopy design all over in white thread. I like to use 70 weight thread, because is nice and thin and I like how the quilting fades into the background. Even on the bolder red blocks you can see the quilting but it doesn't look "thready". Perfect! Plus, it gives you a little more room for error. Or should I say imperfections? :)
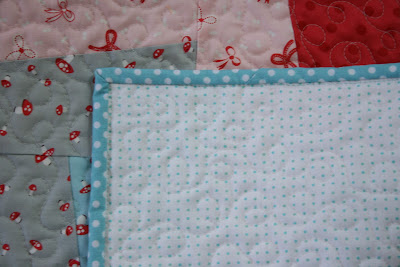
I machine bound it using this fabulous dot from Sarah Jane's Children at Play line. I was going to bind it something pink, but that was just way too sweet. The light aqua worked so much better. I just love these dots!
For the back I used one of my favorite fabrics ever...picnic dot in mint. Totally impractical for a baby quilt, but hey, it's cute!!! And again, sweet, but not too sweet.
The pattern was adapted from my whirlygiggle block tutorial here.
The quilt measures 43" square.

Now it's your turn. Link up your finishes for the week! Remember to link to a specific post. Thanks for joining me for finish it up Friday! Hope you have a great weekend!

I'm an extremist...

...or so it seems! Tara and I had the chance to sew together in while she was here and it was wonderful! We made either very tiny things or very big things, but nothing in between!
We made these tiny wonky whirlygiggle blocks. These were going to be pin cushions, but I think they may turn into a mini quilt instead. Each block will finish at 2.5" x 3". Eeek! I love tiny things!! Especially when they are made from scraps!

I also made this darling little "pin" cushion.
Tara is a part of the Ringo Pie Bee this year, which means she is going to be doing a lot of paper piecing! I thought it would be fun to make her a little cushion to help her keep her sewing machine needles separated. One side is designated for fabric needles and the other side is for needles that have been used for paper piecing (because they dull more quickly after sewing through paper). I absolutely LOVE it! Which means I'll probably be making another one for me. No wonder my sewing list never gets any shorter....but I wouldn't have it any other way!
We also made matching handbags. While we were out shopping, Tara picked up the pattern for the Betty Shopper, by Amy Butler. Amy's patterns really turn out a terrific end product, but they also can be a little intense to sew up. Thankfully Tara was deciphering the directions and then told me what to do after she did hers. Phew!
We didn't have grommets on hand, as the pattern called for, so we sewed the handles to the bag instead, then used antique buttons for a bit of embellishment. I love that touch! And I love making do with what I had on hand.
The bag is HUGE!!! I heard that my almost 9 year old son actually fit in it and it looked like the bag could double as a kayak. I don't actually have proof, and I didn't see it happen, but I would imagine it was hilarious! Maybe I'll have to have him try it out again. :)