Lynn asked about duplicate checks...I have duplicate checks myself and I ripped the vinyl flap off my plastic checkbook cover (from the bank) and I just tuck it in there, unattached. That's been working great for me.
Denitza, a fellow Wisconsin girl, is my winner! She wins the checkbook cover of her choice from the previous post. Thanks, all, for playing along.
For today's tutorial...

cut 5 squares each from 2 different fabrics, for a total of 10 6" squares
here I used denim and decorator fabric
you can use lightweight cotton but you would need to interface for best results

cut a 2" square of card stock
cut a 2.5" square of clear vinyl (I buy remnants at either JoAnn's or Walmart)

using your walking foot, sew around the vinyl on 3 sides to form a little pocket for your label
I like the leave the card stock in there as a guide to help me place my seam.

(do not sew through the paper)

layout 4 squares side by side...


and sew together with a 1/4" seam allowance


take the left side of the strip and the right side of the strip and sew those two together to make a square

take the 5th square and pin it to the bottom (make sure to check the orientation of your label pocket...you don't want it upside down.) sew in the bottom starting and stopping 1/4" from each corner. it's best to start and stop for all 4 seams, rather than to try to make one continuous seam.

set this one aside for now.
repeat these steps (minus the vinyl label) for the lining, BUT
sew three seams, then on the fourth seam leave an opening for turning and for inserting the cardboard

sew between each of the set of pins, leaving about a 4" gap
turn the denim box right side out

now you should have 2 boxes

now you should have 2 boxes
place one box inside the other, making sure that right sides are together

pin around the top, sew the around the entire perimeter of the top using a 1/4" seam allowance.
turn right side out, and either finger press or use an iron to press the top seam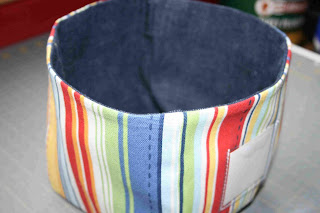
turn right side out, and either finger press or use an iron to press the top seam

using a scant seam allowance, top stitch around the perimeter of the top of the box

now, cut out 5 pieces of cardboard (cereal boxes, pasta boxes, etc.) that measure 5 1/8" square.


isn't this a fun way to recycle? I rarely throw boxes away anymore.
insert each of the 5 pieces of cardboard through the gap used for turning
insert each of the 5 pieces of cardboard through the gap used for turning
one for each side and one for the bottom

this takes some fiddling, I am warning you. but it's worth it.
it helps to kind of nestle each piece in between the seams
once you get the cardboard pieces situated, sew up the hole used for turning. (do this carefully, so your cardboard pieces don't collapse inside.)
once you get the cardboard pieces situated, sew up the hole used for turning. (do this carefully, so your cardboard pieces don't collapse inside.)

label as desired

and you are done!


I also made these that nest inside each other


that have binding attached at the top


and I have made several different versions....

...enough to fit my 72" long desk.

...enough to fit my 72" long desk.
These are a bit addictive. You've been warned. :)
Any questions, I'll try to answer them in the comments.
Enjoy!